Introduction
While React is awesome as such, there are obvious shortcomings when it comes to speed, routing, scaling, etc. NextJS was the answer. This is the latest framework that is used by world's leading companies, thus as a natural extension to learning basic working of React, I gave NextJS a try. While going through their docs, I kept making this note for the reference. You can visit the blog I built, here - Sample Blog
Let's start with the benefits that NextJS framework provides over simple ReactJS application.
Built-in Features
- An intuitive page-based routing system (with support for dynamic routes)
- Pre-rendering, both static generation (SSG) and server-side rendering (SSR) are supported on a per-page basis
- Automatic code splitting for faster page loads
- Client-side routing with optimizes prefetching
- Built-in CSS and Sass support, and support for any CSS-in-JS library
- Development environment which supports Hot Module Replacement
- API routes to build API endpoints with Serverless Functions
- Fully extendable
Starter
npx create-next-app- Template could be downloaded using
--exampleflagnpm init next-app nextjs-blog --example "https://github.com/vercel/next-learn-starter/tree/master/learn-starter"
Routing - Navigate Between Pages
- Create a new page using the file system routing feature
- Learn how to use the
Linkcomponent to enable client-side navigation between pages - Learn about built-in support for code splitting and prefetching
- In Next.js, we use the
<Link>React Component that wraps the<a>tag.<Link>allows you to do client-side navigation to a different page in the application. - Client-side navigation means that the page transition happens using JavaScript, which is faster than the default navigation done by the browser.
If we change any CSS property like
background-colorof<html>and click on the links to navigate between pages, we see that the change persists between page transitions. This shows that the browser does NOT load the full page and client-side navigation is working.If we had use
<a href="...">instead of<Link href="...">and did this, the change (background-colorhere) will be cleared on link clicks because the browser does the full refresh.
Code splitting and prefetching
-
Next.js does 'code-splitting' automatically, so each page only loads what's necessary for that page. That means when the homepage is rendered, the code for other pages is not served initially. This ensures that the homepage loads quickly even if you add hundreds of pages.
-
Only loading the code for the page you request also means that pages becomes isolated. If a certain page throws an error, the rest of the application would still work.
-
In a production build of Next.js, whenever
Linkcomponents appear in the browser's viewport, Next.js automatically prefetches the code for the linked page in the background. By the time you click the link, the code for the destination page will already be loaded in the background, and the page transition will be near-instant. -
If you need to link to an external page outside the Next.js app, just use an
<a>tag withoutLink. -
If you need to add attributes like, for example,
className, add it to theatag, not theLinktag.
import Link from 'next/link'

export default function LinkClassnameExample(){
    return(
        <Link href="/">
            <a className="foo" target="_blank" rel="noopener noreferrer">
                Hello World
            </a>
        </Link>
    )
}
Assets, Metadata, and CSS
- Next.js can serve static assets, like images, under the top-level
publicdirectory. Files insidepubliccan be referenced from the root of the application similar topages.
<img src="/vercel.svg" alt="Vercel Logo" className="logo" />
- The
publicdirectory is also useful forrobots.txt, Google Site Verification, and any other static assets.
CSS Styling
styled-jsxlibrary (a "CSS-in-JS" library that lets you write CSS within a React component, and the CSS styles will be scoped, meaning other components won't be affected.)
<style jsx>{'
    ...
'}</style>
- CSS Modules lets us import CSS files in a React component.
- To use CSS Modules, the CSS file name must end with
.module.css

CSS Module automatically generates unique class names.
- CSS Modules are extracted from the JavaScript bundles at the build time and generate
.cssfiles that are loaded automatically by Next.js
Global Styles
- To load global CSS files, create a file called
_app.jsunderpageswith following code -
export default function App({Component, pageProps}){
    return <Component {...pageProps} />
}
-
Appcomponent is the top-level component which will be common across all the different pages. You can use thisAppcomponent to keep state when navigating between pages. -
Development server needs to be restarted after adding
_app.js
npm run dev
- In Next.js, we can add global CSS files by importing them from
_app.js. We cannot import global CSS anywhere else.
Summary
To use CSS Modules, import a CSS file named
*.module.cssfrom any componentTo use global CSS, import a CSS file in
pages/_app.js
Pre-rendering
-
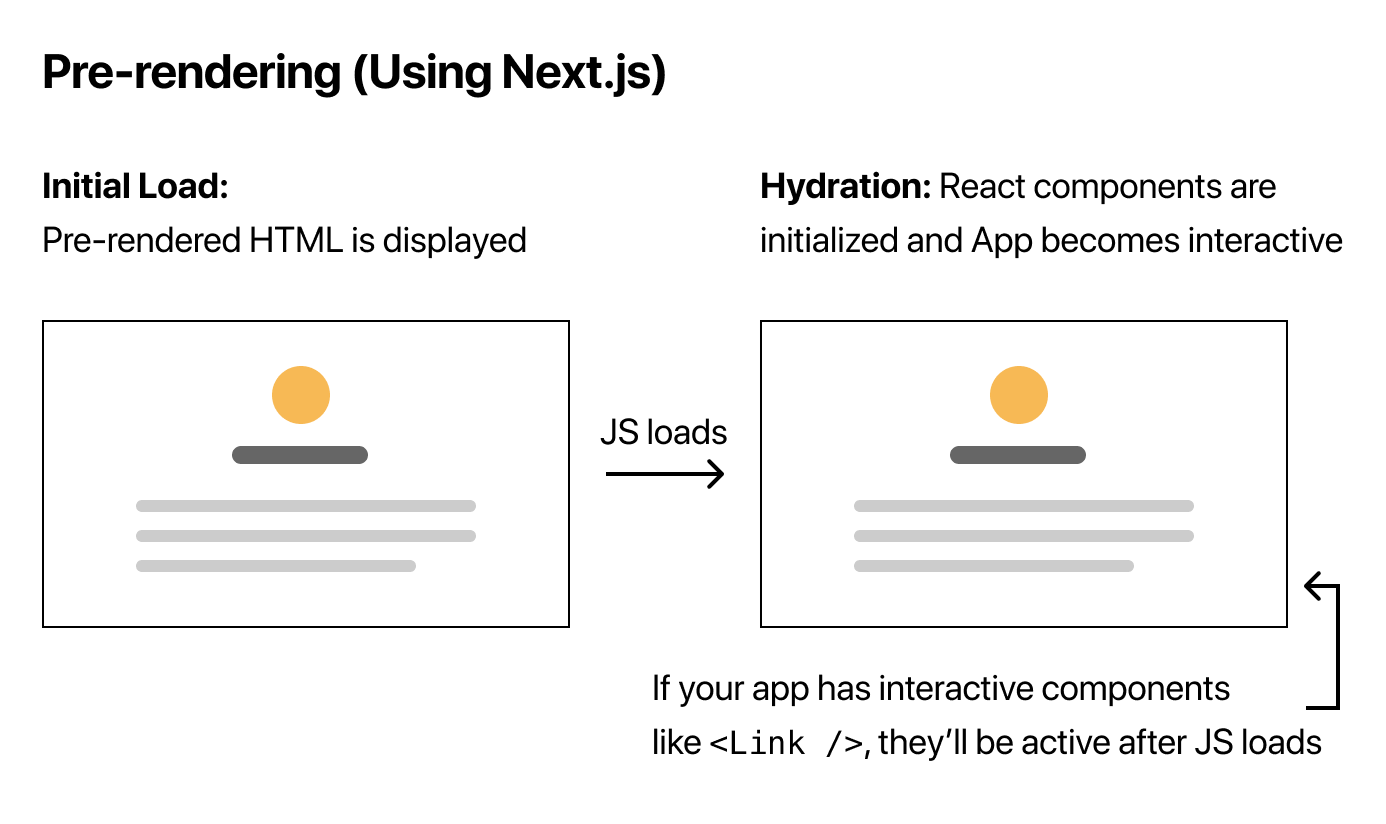
By default, Next.js pre-renders every page. It generates HTML for each page in advance, instead of having it all done by client-side JavaScript.
-
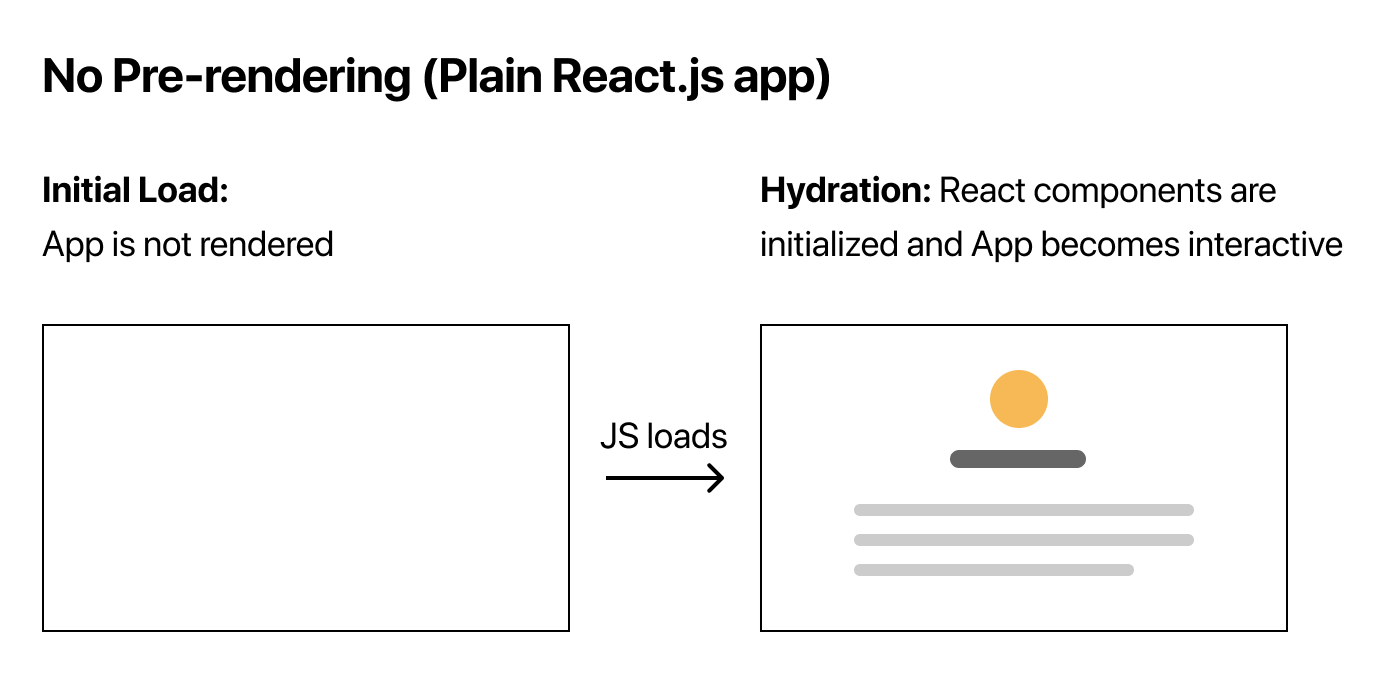
Each generated HTML is associated with minimal JavaScript code necessary for that page. When a page is loaded is loaded by the browser, its JavaScript code runs and makes the page full interactive. This process is called hydration.
Pre-rendering can result in better performance and SEO.
- Pre-rendering Vs. No Pre-rendering Comparison -
Two Forms of Pre-rendering
-
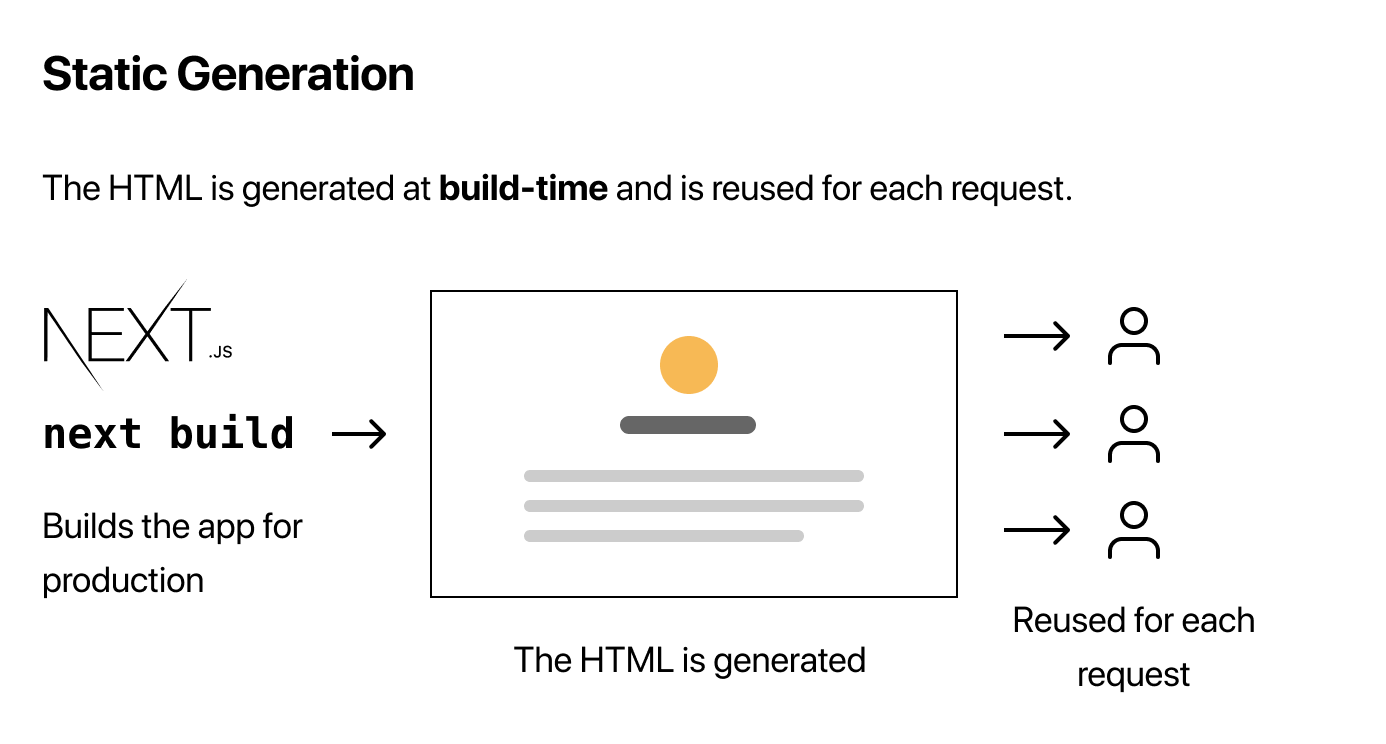
Next.js has two forms of pre-rendering: Static Generation and Server-side Rendering. The difference is in when it generates the HTML for a page.
-
Static Generation is the pre-rendering method that generates the HTML at build time. The pre-rendered HTML is then reused on each request.
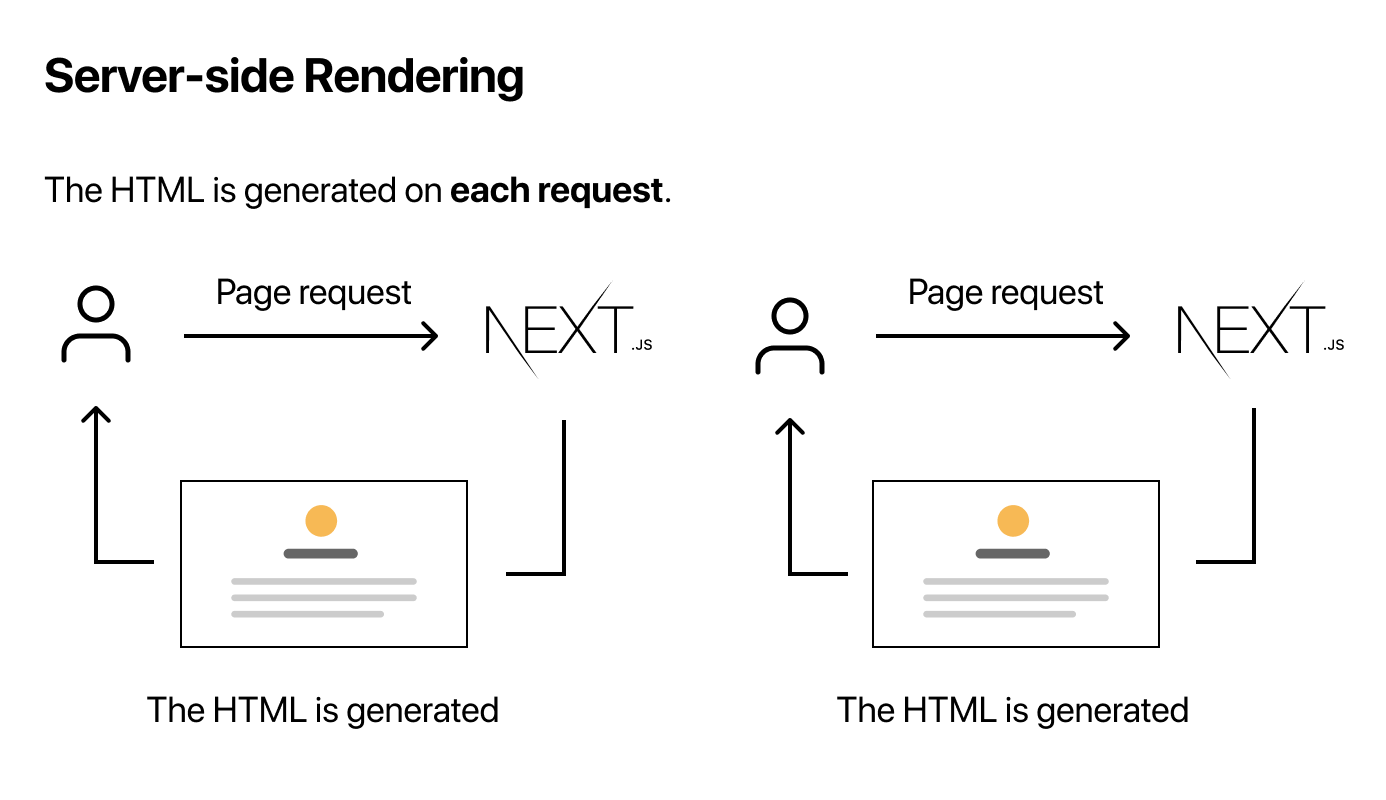
-
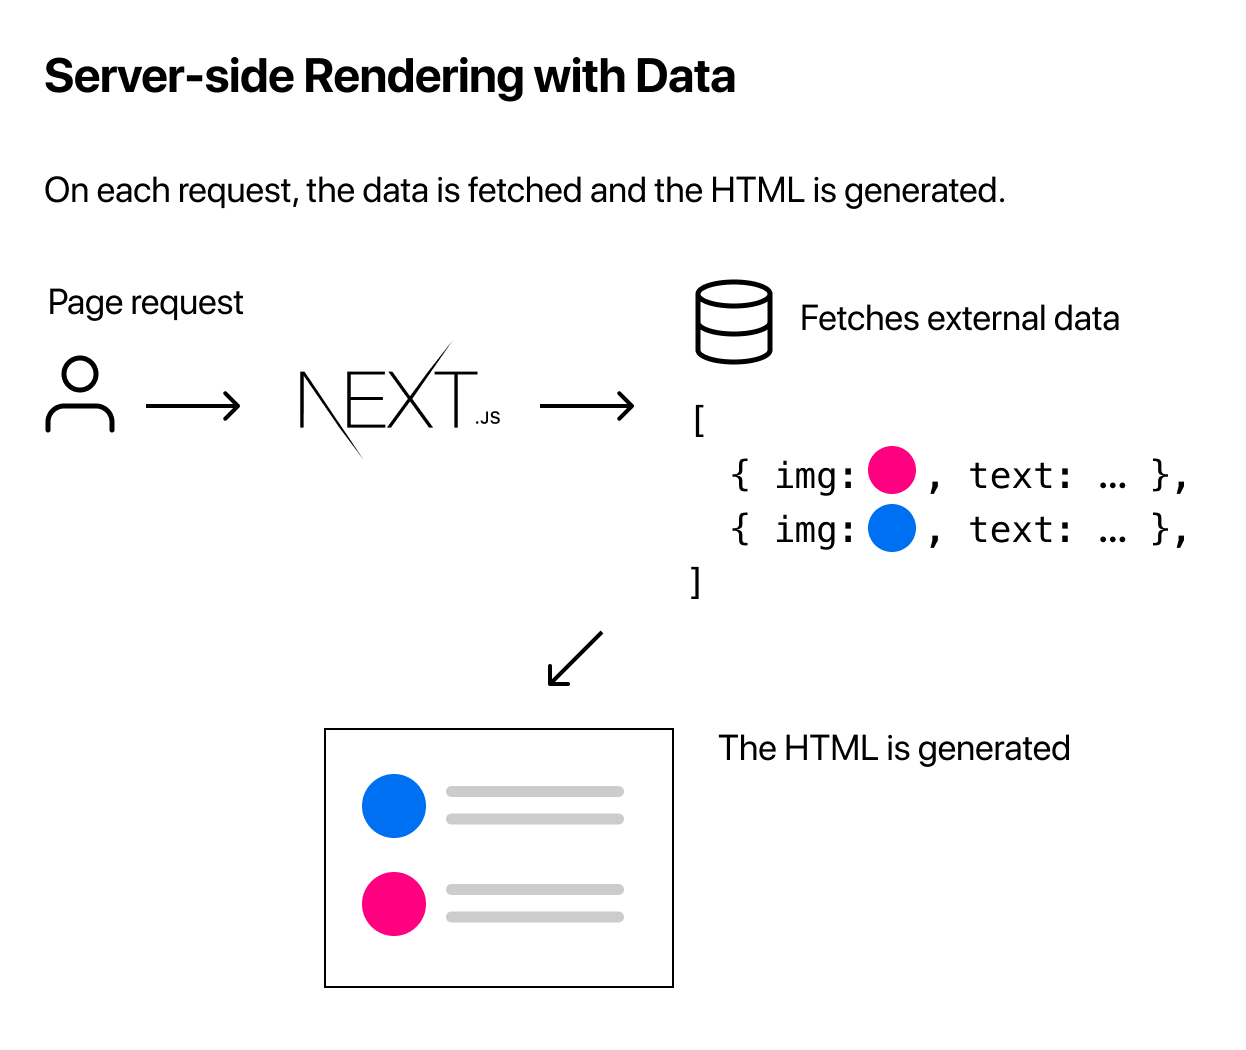
Server-side Rendering is the pre-rendering method that generates the HTML on each request.
In development mode (when we run
npm run devoryarn dev), every page is pre-rendered on each request - even for pages that use Static Generation.
-
Per-page Basis - Next.js lets you choose which pre-rendering form to use for each page. You can create a "hybrid" Next.js app by using Static Generation for most pages and using Server-side Rendering for others.
-
Use Static Generation (with and without data) whenever possible because the page can be built once and served by CDN, making it faster than having a server render a page on every request.
-
If we cannot pre-render a page ahead of a user's request, then only we should go for Server-side rendering. It maybe because our page shows frequently updated data, and the page content changes on every request.
-
Albeit slow, pre-rendered page will always be up-to-date. Or we can skip pre-rendering and use client-side JavaScript to populate data.
Static Generation with and without Data
- For pages which do not require fetching external data, Next.js automatically generates them statically when the app is built for production.
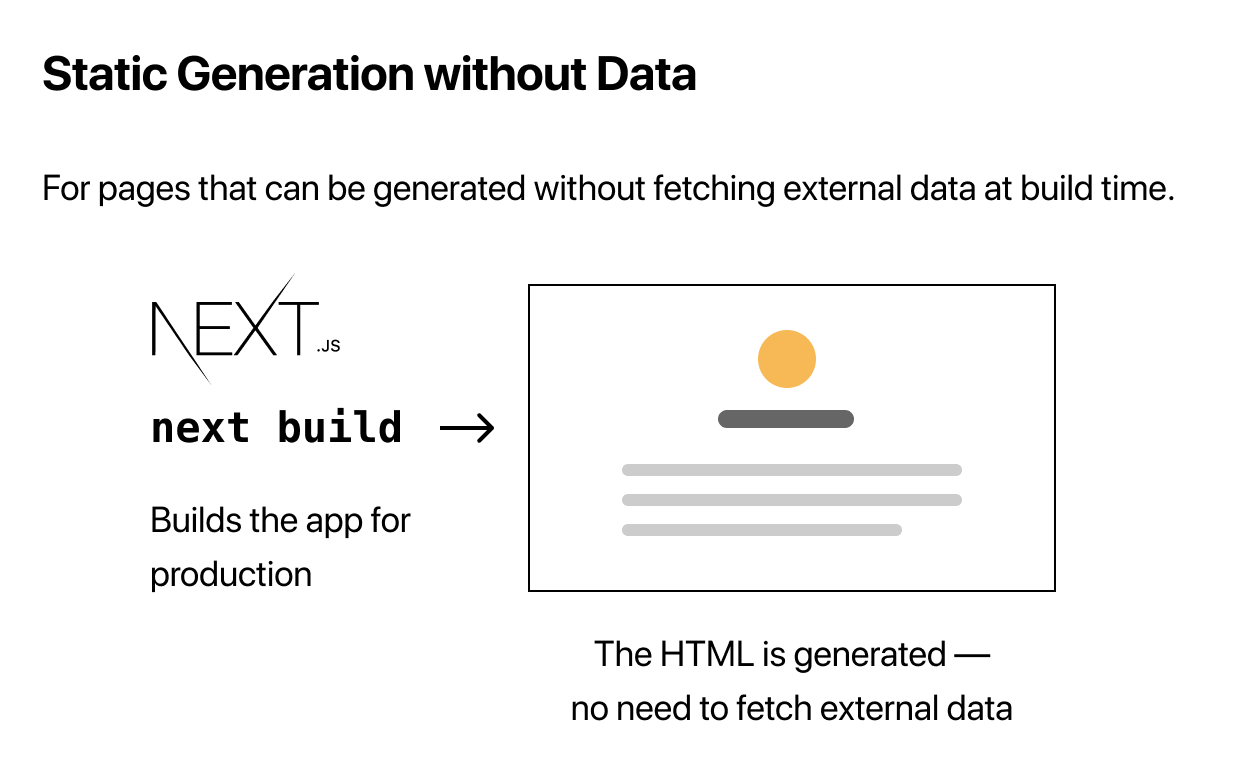
- In case, some pages need to access the file system, fetch external API, or query your database at build time, even then Next.js might be able to render the HTML without first fetching some external data. Next.js supports Static Generation with Data out of the box.

Static Generation with Data using getStaticProps
- When we export a page component, we can also export an
asyncfunction calledgetStaticProps.
getStaticPropsruns at build time in production and inside the function, you can fetch external data and pass that as the props of the page.
export default function Home(props){ ... }

export async function getStaticProps(){
    //Get external data from the file system/API/DB, etc.

    const data = ...

    //The value of the `props` key will be passed to the `Home` component

    return {
        props: ...
    }
}
- Essentially,
getStaticPropsallows you to tell Next.js: \"Hey, this page has some data dependencies - so when you pre-render this page at build time, make sure to resolve them first!"
Blog Data
pre-rendering.md file created in top-level 'posts' directory.
---
title: 'Two Forms of Pre-rendering'
date: '11-07-2020'
---

Next.js has two forms of pre-rendering: **Static Generation** and **Server-side Rendering**. The difference is in **when** it generates the HTML for a page.

- **Static Generation** is the pre-rendering method that generates the HTML at **build time**. The pre-rendered HTML is then _reused_ on each request.
- **Server-side Rendering** is the pre-rendering method that generates the HTML on **each request**.

Importantly, Next.js lets you **choose** which pre-rendering form to use for each page. You can create a "hybrid" Next.js app by using Static Generation for most pages and using Server-side Rendering for others.
Notice that each markdown file has a metadata section at the top containing
titleanddate. This is called YAML Front Matter, which can be parsed using a library called gray-matter.
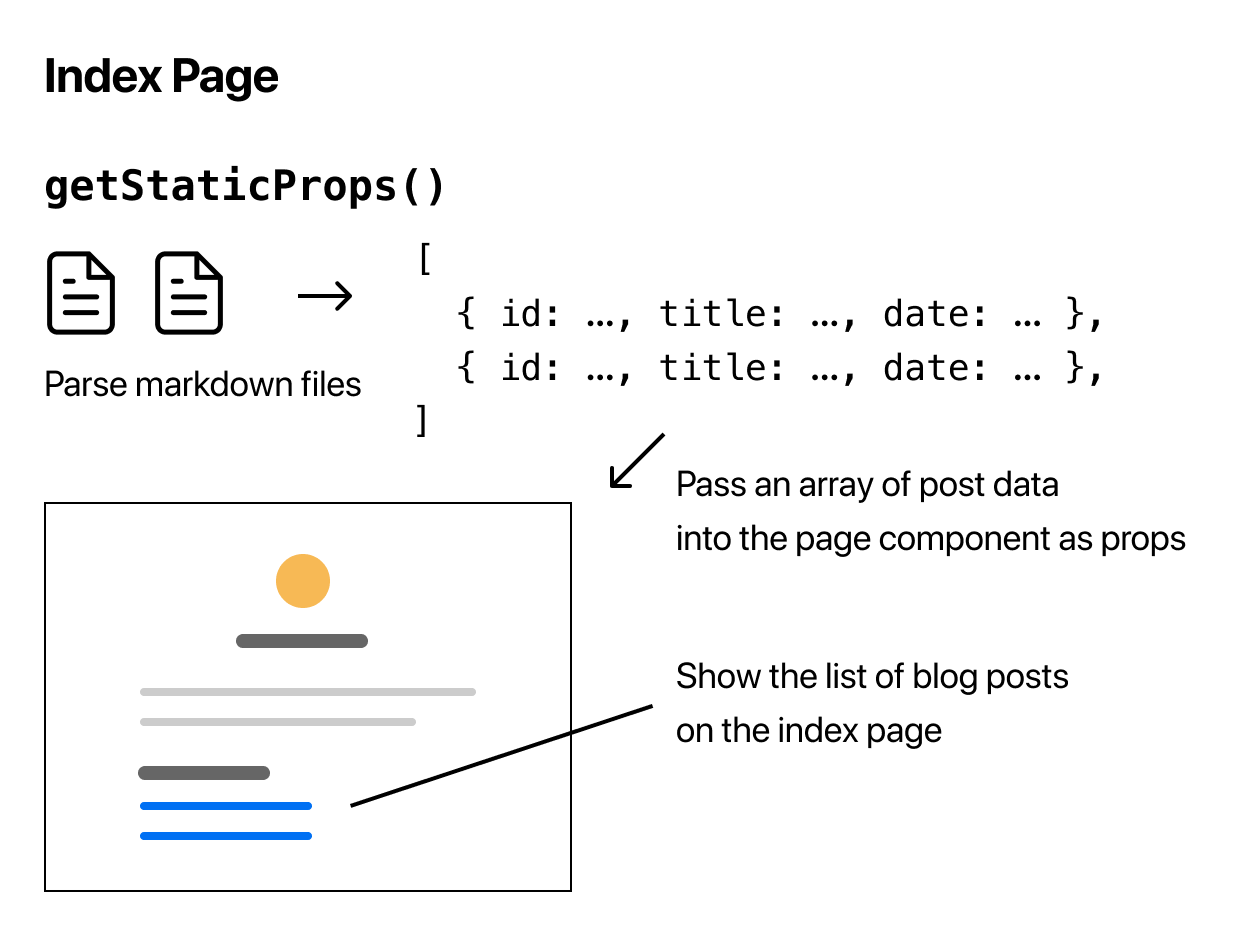
Parsing Blog Data on getStaticProps
- To parse each markdown file and get
title,date, file name (which will be used asidfor the post URL), and list the data on the index page (sorted by date), we need to implementgetStaticPropsby updating our index page (pages/index.js) using the above data.
Pre-rendering and Data Fetching
- After installing
gray-matterwe parse the markdown posts by creatinglib/posts.jsfile in the top domain. Then we import the function inpages/index.jsas
import { getSortedPostsData } from '../lib/posts'
Then we call this function in getStaticProps and return the result inside the props key as
export async function getStaticProps(){
    const allPostsData = getSortedPostsData()
    return {
        props: {
            allPostsData
        }
    }
}
And then allPostsData prop will be passed to the Home component.
export default function Home ({ allPostsData }) { ... }
To display the data -
{allPostsData.map(({id, date, title}) => (
    <li className={utilStyles.listItem} key={id}>
        {title}
        <br />
        {id}
        <br />
        {date}
    </li>
))}
We successfully fetch external data (from the file system)and pre-render the index page with this data -
Fetch External API or Query Database
import fetch from 'node-fetch'

export async function getSortedPostsData(){
    //Instead of the file system, fetch post data from an external API endpoint
    const res = await fetch('..')
    return res.json()
}
Querying Database Directly
import someDatabaseSDK from 'someDatabaseSDK'

const databaseClient = someDatabaseSDK.createClient(...)

export async function getSortedPostsData(){
    //Instead of the file system, fetch post data from a database
    return databaseClient.query('SELECT posts...')
}
- This is possible because
getStaticPropsruns only on the server-side. It will never be run on the client-side. It won't even be included in the JS bundle for the browser. That means you can write code such as direct database queries without them being sent to browsers.
Development Vs. Production
- In development (
npm run devoryarn dev),getStaticPropsruns on every request while in production,getStaticPropsruns at build time.
Because it's meant to be run at build time, we won't be able to use data that's only available during request time, such as query parameters or HTTP headers.
- Also
getStaticPropscan only be exported from a page. We can't export it from non-page files. One of the reasons for this restriction is that React needs to have all the required data before the page is rendered.
Fetching Data at Request Time
- If we need to fetch data at request time instead of build time, we can try Server-side Rendering. Here, we need to export
getServerSidePropsinstead ofgetStaticPropsfrom your page.
export async function getServerSideProps(context){
    return{
        props: {
            // props for your component
        }
    }
}
We should use
getServerSidePropsonly if we need to pre-render a page whose data must be fetched at request time. TTFB (Time to First Byte) will be slower thangetStaticPropsbecause the server must compute the result on every request, and the result cannot be cached by a CDN without extra configuration.
Client-Side Rendering
- As alternative strategy to pre-rendering, we can Statically generate (pre-render) only parts of the page that do not require external data and then fetch external data from the client using JavaScript when the page loads and populate the remaining parts.
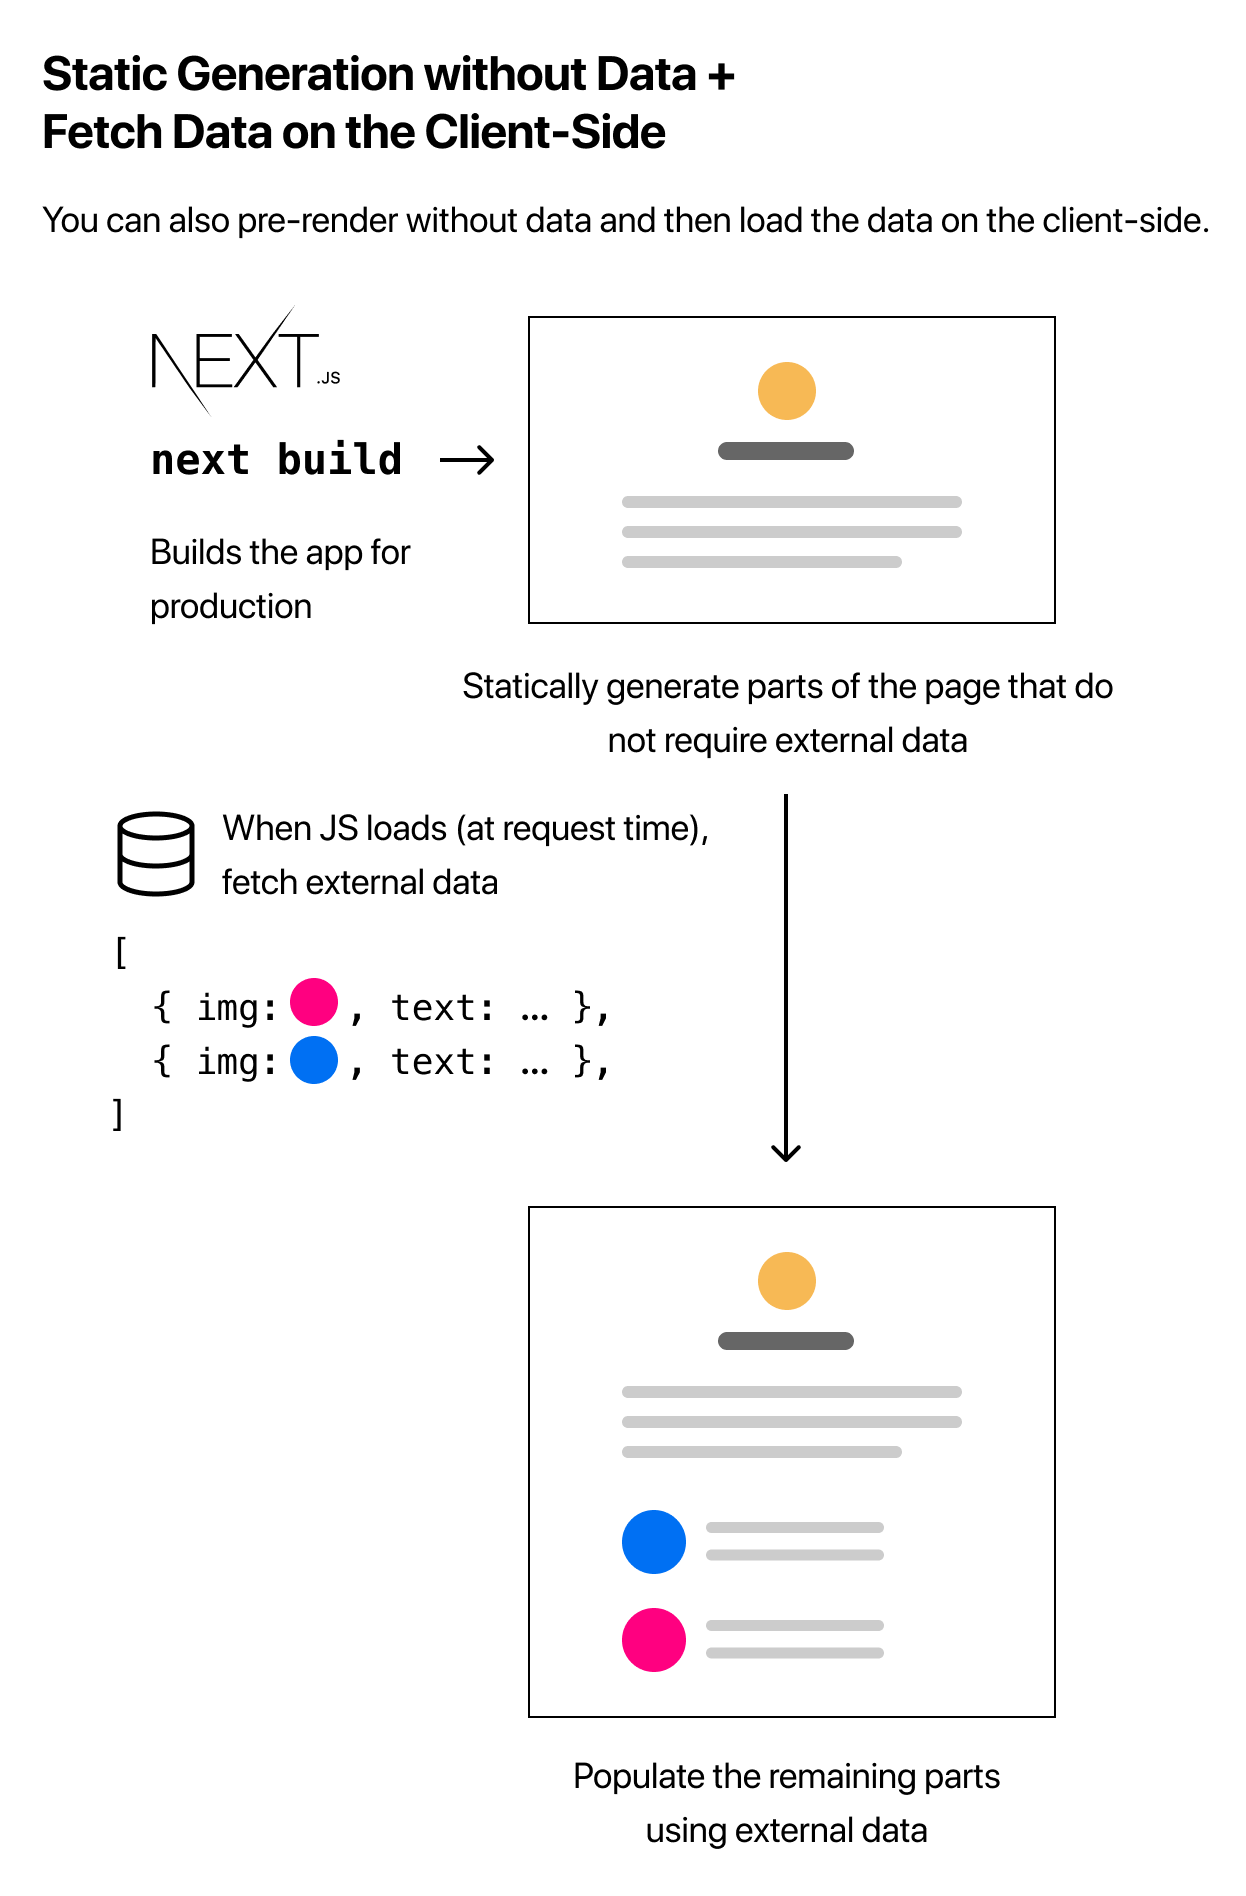
e.g - In user dashboard like pages, we can use this approach because it is a private, user-specific page, SEO is not relevant, and the page doesn't need to be pre-rendered. Data is frequently updated, which required request-time data fetching.
SWR - React Hook for Data Fetching
- Highly recommended when fetching data on the client side. It handles caching, revalidation, focus tracking, refetching on interval, and more.
import useSWR from 'swr'

function Profile(){
    const {data, error} = useSWR('/api/user',fetch)

    if (error) return <div> failed to load </div>
    if (!data) return <div> loading...</div>
    return <div> hello {data.name}!</div>
}